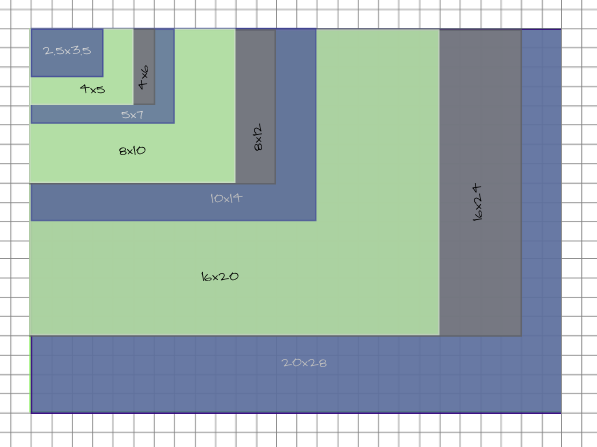
Print sizes can be a little confusing. The standard sizes represent the ratio of width to height of a picture (typically measured in inches). Pictures are either portrait (vertical) or landscape (horizontal) when it comes to these ratios.
It might be easy to visualize the difference between a 4x6, 5x7, and 8x10 print, but did you realize these are not equivalent? A 4x6 picture printed as 5x7 print looks different. In fact, you might think the picture was blown up a little bit. You lose parts of your picture when you start changing the ratios. Each photographer decides when they save their pictures, what size to save. I'm not talking about quality, as in resolution. I'm talking about the actual picture size ratio. I use to save all my pictures with the 5x7 ratio. I started encountering more and more issues when printing 8x10's, so I've changed my process to keep the standard size from my camera, which is closer to a 4x6 ratio.
After trying to help my customers understand these differences, I decided to come with some examples. Below I've shown the relationship between the most common print sizes (4x6 (gray), 5x7 (blue) & 8x10 (green)) and their equivalent enlargement print sizes (8x12, 10x14, 16x20). As you can see, the only common enlargement in this bunch is 16x20. Most people don't print 8x12, they choose the 8x10. Most people don't print the 10x14, they chose the 11x14 (not even on this chart). Why? Well, basically because the 8x10 & 11x14 are the common frame sizes on the store shelves. Someone, somewhere made these retail choices for us and now we have to deal with the shortcomings.
I did show one other size below, the 2.5x3.5 ratio. It's not exactly a standard size for the wallet prints, but at least you can see the relationship better between a 5x7 and a wallet. I could have shown the 2x3 (a mini 4x6) but my picture was getting a little cluttered at this point! :)
So how does this interpolate to an actual picture? Below you can see a picture I took a few years ago of my daughter and my niece. At the 5x7 size there will be a lot of foliage in the print. If I wanted to make this a 4x6 print, I would lose a lot of the foliage, but I would have a sweet close up of the girls hugging. Now, the 4x5 usually isn't a size on my radar but keep in mind it's enlargement is the highly popular 8x10.
This is what happens when you start resizing a picture. Notice how the 5x7 looks as a 8x10 (or 4x5 enlargement). Whoa, there's now about an inch of white on the print page. Trust me, it does not look good when you actually print it this way. You're customer will wonder why there is white space left on the print page.
Thanks to Photoshop and other
editing tools, we do have some fairly effective ways to fix the problem. But, most likely you will lose some of the trees.
Now, it really wouldn't matter in this particular picture, but what if
your picture was of a group? Now, you might have lost someone's head
or arms by resizing it to a different ratio. In this case, I would limit the sizes available for printing the picture.


0 comments:
Post a Comment